Working with NetFlow Features

Catalyst 4500 Series Switch IOS NetFlow Configuration
——————————————————————-

switch(config)# ip flow ingress
switch(config)# ip flow ingress infer-fields
switch(config)# ip flow-export destination <Nectus IP address> 2055
switch(config)# ip flow-export source Loopback0
switch(config)# ip flow-export version 9
switch(config)# ip flow-cache timeout active 1
switch(config)# ip flow-cache timeout inactive 15

Cisco 3800 Series Router NetFlow Configuration
—————————-
Step 1. Define Flow Record format
router(config)# flow record NECTUS_NETFLOW_RECORD
router(config-flow-record)# description NetFlow record format to send to Nectus Netflow Collector
router(config-flow-record)# match ipv4 ttl
router(config-flow-record)# match ipv4 tos
router(config-flow-record)# match ipv4 protocol
router(config-flow-record)# match ipv4 source address
router(config-flow-record)# match ipv4 destination address
router(config-flow-record)# match transport source-port
router(config-flow-record)# match transport destination-port
router(config-flow-record)# match interface input
router(config-flow-record)# match flow direction
router(config-flow-record)# collect interface input
router(config-flow-record)# collect interface output
router(config-flow-record)# collect counter bytes
router(config-flow-record)# collect counter packets
router(config-flow-record)# collect timestamp absolute first
router(config-flow-record)# collect timestamp absolute last
router(config-flow-record)# collect routing source as
router(config-flow-record)# collect routing destination as


Step 2. Create Flow Exporter (Specify where NetFlow to be sent)
router(config)# flow exporter NECTUS_NETFLOW_EXPORTER
router(config-flow-exporter)# description Export NetFlow to Nectus
router(config-flow-exporter)# destination <Nectus IP address>
router(config-flow-exporter)# source Loopback0
router(config-flow-exporter)# transport udp 2055
router(config-flow-exporter)# export-protocol netflow-v9


Step 3. Create Flow Monitor (Bind Flow Record to the Flow Exporter)
router(config)# flow monitor NECTUS_NETFLOW_IPv4_MONITOR
router(config-flow-monitor)# record NECTUS_NETFLOW_RECORD
router(config-flow-monitor)# exporter NECTUS_NETFLOW_EXPORTER
router(config-flow-monitor)# cache timeout active 60


Step 4. Assign Flow Monitor to Selected Interfaces
Repeat this step for every interface you are interested collecting NetFlow for.
router(config)# interface TenGigE 1/1  (repeat for every interface that you need)
router(config-if)# ip flow monitor NECTUS_NETFLOW_IPv4_MONITOR input
router(config-if)# ip flow monitor NECTUS_NETFLOW_IPv4_MONITOR output


Step 5. Operation Validation
show flow record NECTUS_NETFLOW_RECORD
show flow monitor NECTUS_NETFLOW_IPv4_MONITOR statistics
show flow monitor NECTUS_NETFLOW_IPv4_MONITOR cache

Requirements:  Operating System: Ubuntu 22.04.1 LTS       RAM: 16GB   vCPU: 2

More information about installation: https://clickhouse.com/docs/en/install/#self-managed-install

Step 1

Open terminal and install required packages:

sudo apt-get update
sudo apt-get install -y apt-transport-https ca-certificates dirmngr

Step 2

Import the ClickHouse public key:

sudo apt-key adv –keyserver hkp://keyserver.ubuntu.com:80 –recv 8919F6BD2B48D754

NOTE: It is recommended to import the public key if it’s a fresh Ubuntu install.

Otherwise, you may get the following error when adding the repository:

GPG error: http://repo.clickhouse.com/deb/stable/main/release:
The following signatures couldn’t be verified because the public key is not available:

NO_PUBKEY 8919F6BD2B48D754

Step 3

Add ClickHouse repository:

echo “deb https://packages.clickhouse.com/deb stable main” | sudo tee \
/etc/apt/sources.list.d/clickhouse.list

Step 4

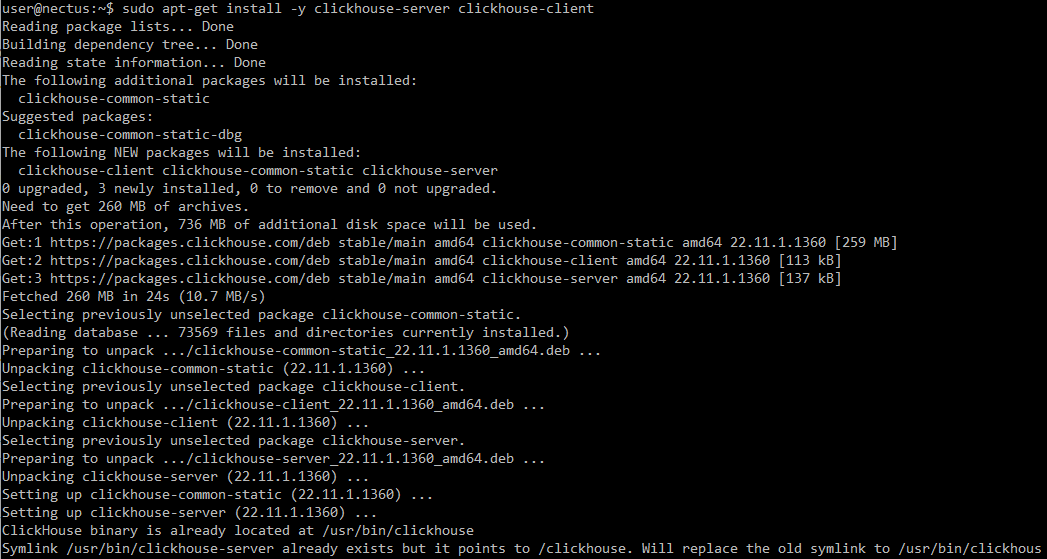
Install ClickHouse:

NOTE: During the installation you will be asked to create a password for default user.

Generate a strong password and save it, it will be used for further configuration.

sudo apt-get update
sudo apt-get install -y clickhouse-server clickhouse-client

Step 5

Start ClickHouse server as a daemon:

sudo service clickhouse-server start

Step 6

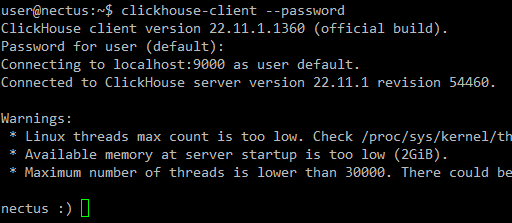
Now after installation it is time to test connection to ClickHouse database.

Start client (use password generated on Step 4):

clickhouse-client –password

NOTE: Use Ctrl+D to exit ClickHouse client.
NOTE: TCP ports 8123 and 9000 must be open

Step 7

NOTE: Use Ctrl+D to exit ClickHouse client.

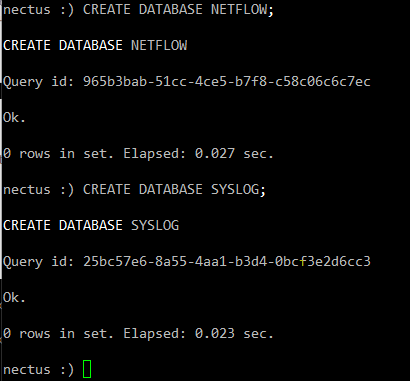
While being connected to the ClickHouse, create required Netflow & Syslog databases:

CREATE DATABASE NETFLOW;
CREATE DATABASE SYSLOG;

ClickHouse Configuration

Step 8

By default, ClickHouse allows inbound connections from localhost only.

To allow connections from remote IP-s

edit /etc/clickhouse-server/config.xml:

sudo vim /etc/clickhouse-server/config.xml

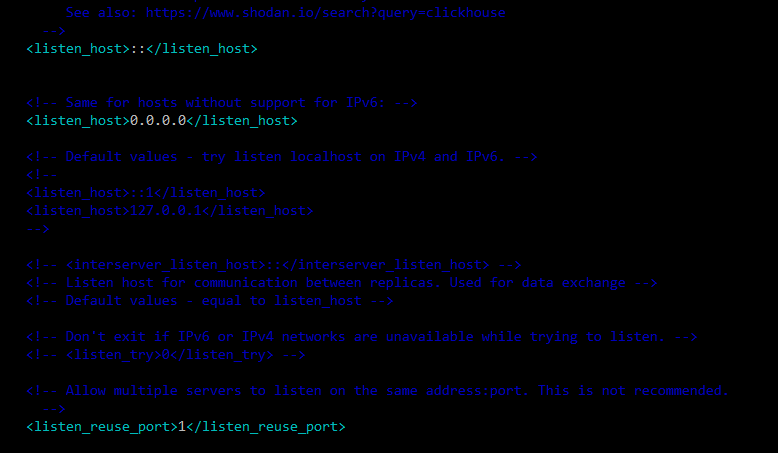
Find <listen_host> parameters (one for IPv6 and one for IPv4) allowing all connections after <logger> section, and uncomment them.

Also uncomment and change to 1 <listen_reuse_port> tag for allowing simultaneous IPv4 and IPv6 interfaces:

<listen_host>::</listen_host>

<!– Same for hosts without support for IPv6: –>
<listen_host>0.0.0.0</listen_host>

<listen_reuse_port>1</listen_reuse_port>

Step 9

Restart ClickHouse to apply new parameters:

sudo service clickhouse-server restart

Step 10

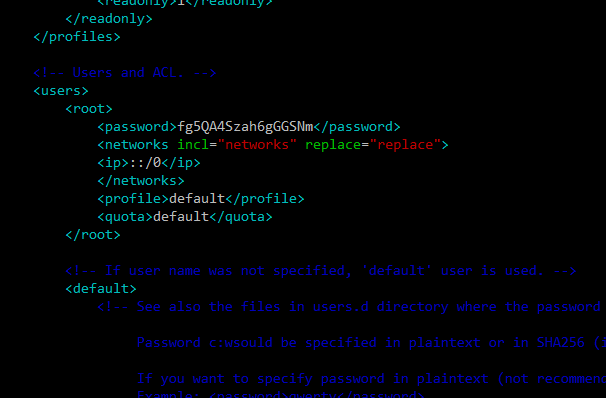
Add internal ClickHouse user “root” for Nectus server to connect to DB.

For that edit users.xml file:

sudo vi /etc/clickhouse-server/users.xml

Find <users> section right after <profiles> section.

Add code snippet with user configuration from below, right between </users> and <default> tags, as on a screenshot below.

Generate strong password, replace it in snippet below, and then save file:

<root>
<password>**********</password>
<networks incl=”networks” replace=”replace”>
<ip>::/0</ip>
</networks>
<profile>default</profile>
<quota>default</quota>
</root>

NOTE: If file was overwritten by WinSCP or any other similar tool, verify that file has correct ownership:

sudo chown clickhouse:clickhouse /etc/clickhouse-server/users.xml

Step 11

Restart ClickHouse to apply new user:

sudo service clickhouse-server restart

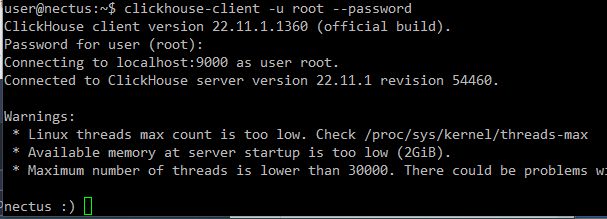
Step 12

Verify newly created user able to log in:

clickhouse-client -u root –password

Step 13

Disable limit of max database size to drop. By default, ClickHouse doesn’t allow to drop table bigger than 50 Gb to prevent occasional data loss.

NOTE: More info here: https://cloud.yandex.com/en/docs/managed-clickhouse/concepts/settings-list#dbms-cluster-settings

To disable it, edit config file /etc/clickhouse-server/config.xml:

sudo vi /etc/clickhouse-server/config.xml

Find and uncomment line to disable limit of max table size to drop:

<max_table_size_to_drop>0</max_table_size_to_drop>

Restart ClickHouse to apply change:

sudo service clickhouse-server restart

Nectus Configuration

Step 14

We have completed the ClickHouse installation. This last step requires login to Nectus to finish the NetFlow/Syslog integration.

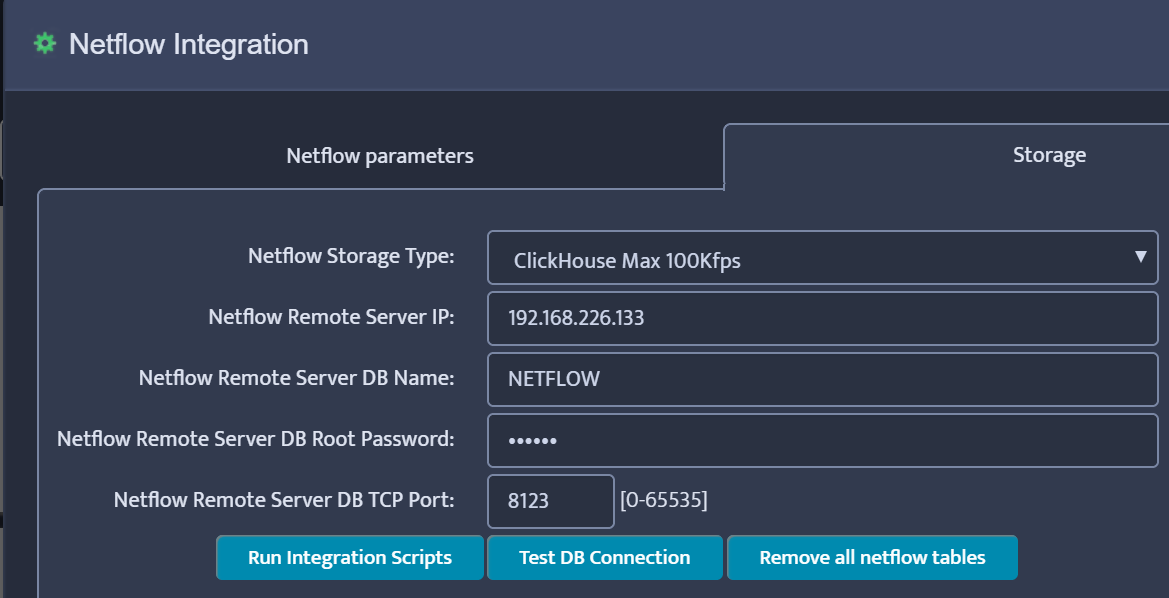
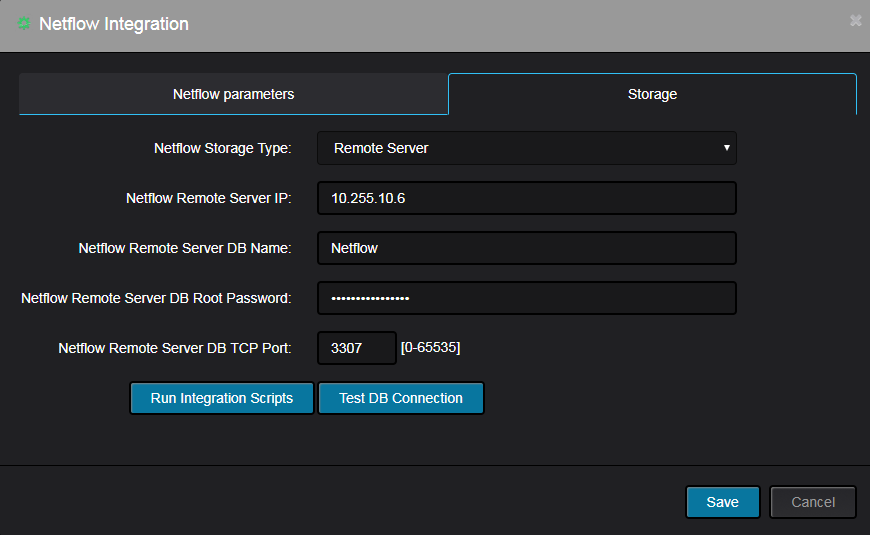
Open to “Nectus Settings -> General Settings -> Netflow Integration” page:

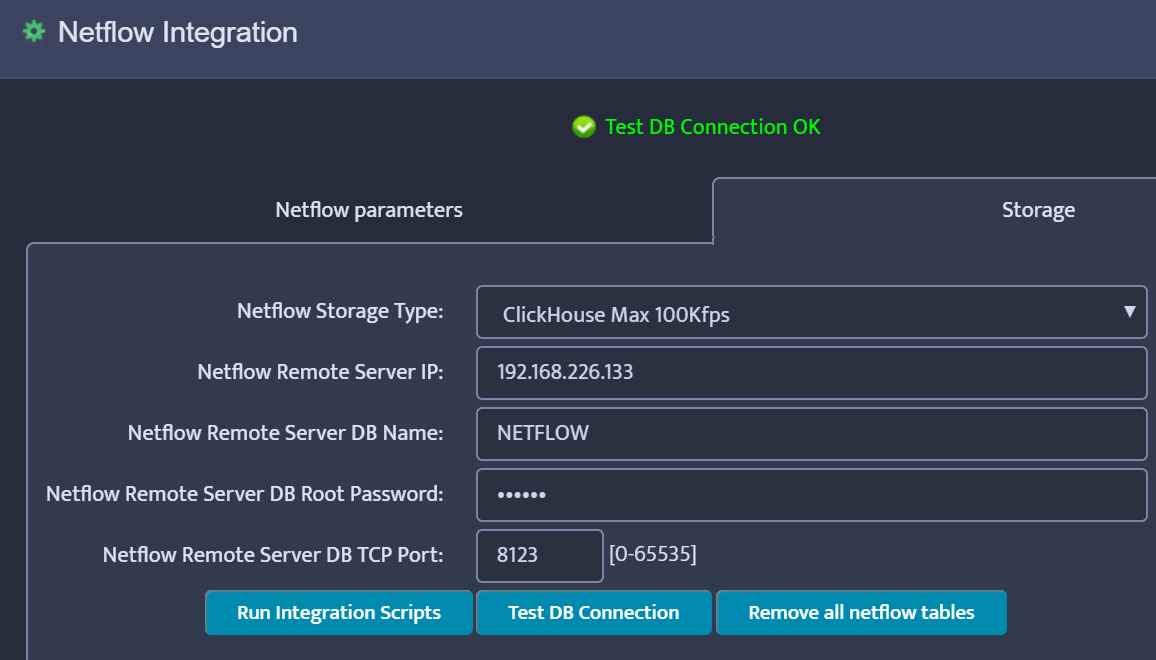
Enter the required information and click Test DB Connection (Remote Server IP is the IP address of the Ubuntu/ClickHouse server). The result should be “Test DB Connection OK”

Click “Run Integration Scripts” and finally Save.

Step 15

Restart Nectus NetFlow and Syslog Services.

How to Configure Nectus NetFlow Collector to use Local Storage

To configure Nectus Netflow collector storage settings go to Main Menu

Settings → General Settings → NetFlow Integration

Configure Storage parameters according to this example:

“NetFlow Remote Server DB Root Password” should be taken from this file:

C:\Program Files\Nectus\Web\Apache24\htdocs\protected\config\database.ini

After Configuration is finished press “Test DB Connection” to test connectivity to DB

After DB connectivity is Tested, Press “Run Integration Scripts” button to create required SQL

Tables.

After Integration Scripts has been executed, Restart NetFlow collector service in

Top menu “Settings → Services Status”

After NetFlow Service is Restarted it should be ready to process NetFlow Traffic and store it in local DB.


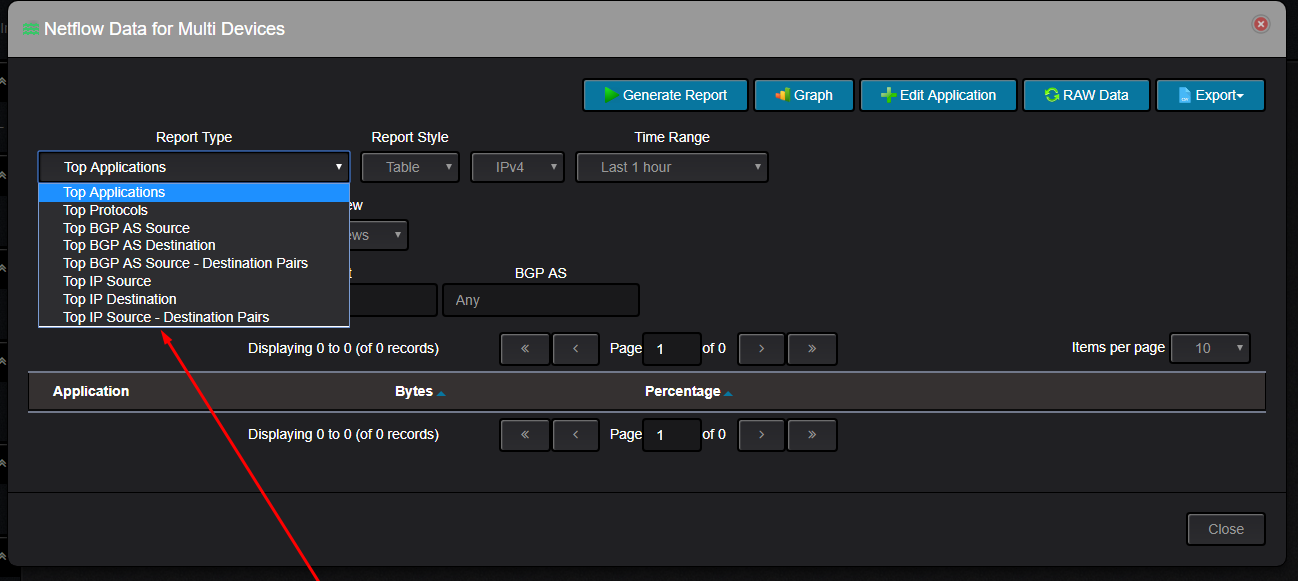
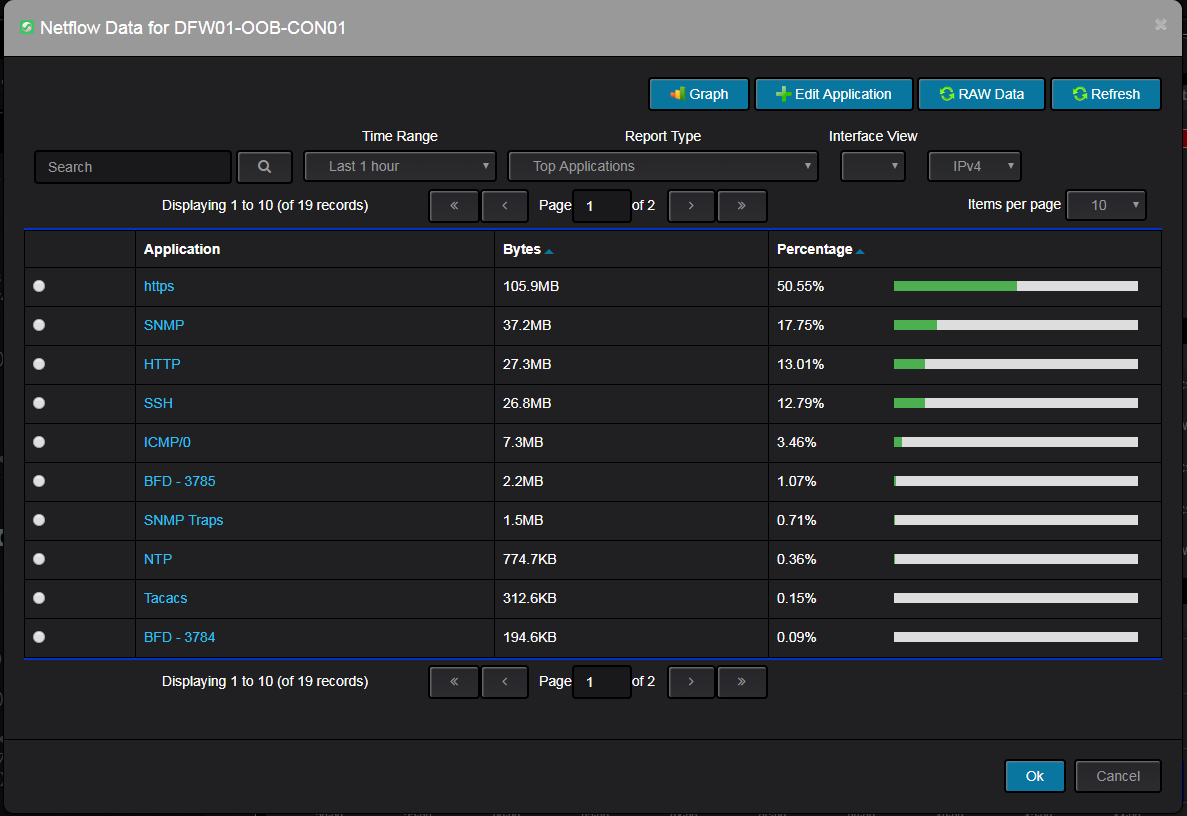
Here is the list of NetFlow reports currently supported by Nectus

Top Applications
Top Protocols
Top Source IP
Top Destination IP
Top Source + Destination IP pairs
Top Source BGP AS
Top Destination BGP AS
Top Source + Destination BGP Pairs


Well, if you are reading this article you probably know what NetFlow is and how much data it can generate. 100GB of NetFlow records per day is not something totally unusual in NetFlow business.

We tried most of the commercial and open-source existing database engines like Microsoft SQL Server, MongoDB, PostegreSQL, MySQL or even Oracle and were not happy with results.

We tried turning off all the indexing, implemented daily partitions,  decided not to store some less important NetFlow fields  and may be even

upgraded your storage to those fancy M2 SSD and still NetFlow reports took minutes to appear.

If your NetFlow rates are somewhere under 1,000 flows per second you can skip this reading, pick any  DB and it will produce acceptable results.

Problems becomes visible when your flow rates  reaches 2,000 fps and at 10,000 fps just doing INSERT to your tables takes 70% of the time.

10,000 flows per second produces 600,000 database records every minute and only INSERT statement takes around 40 second to process leaving only 20 seconds of

available time  for any reports to be generated. The main problem here is that conventional DB engines are not optimized for storing read-only sequential data such

as time based event logging or NetFlow. Best database engine for Netflow has to be designed with read-only sequential access in mind, no “Delete-Update” functionality is required for NetFlow.

This restriction allows great simplification of DB internal formatting structure  and processing logic. Second DB feature that best suited for NetFlow is reduction of possible Indexes to one.

There is absolutely no value in having indexes for Source/Destination IP addresses or Source/Destination ports as those indexes only benefit single type of NetFlow report

and each index will double your table size on disk. The only Index that is used in all reports is Index by flow time stamp as all NetFlow reports are focused on very specific time frame.

And last but not least DB feature that is required for perfect NetFlow storage is hardware optimization. Allocating each DB thread to a dedicated CPU core  has shown

to increase query processing time by 10x.

When  developing our own NetFlow collector we tried all well-known DB engines with one performing slightly better than others but none of them were able to support the golden standard of 30Kfps.

This was until we met the ClickHouse, open source DB engine developed by Yandex. ClickHouse has a long list of limitations, but those limitations are implemented with

a single purpose to have the fastest logging DB engine available on the market. With a help of ClickHouse Nectus can process 50,000 flow per second in single VM which  is currently

a record among all commercially available NetFlow collectors.

Download your 60-day Trial of the best NetFlow collector.


When selecting specs for Nectus VM that will be used for Netflow collection storage we recommend following specifications:

RAM: Amount of RAM has to be not less that Netflow DB size growth in one week.

Example:  Your Netflow  storage grows by 10GB every day. Recommended RAM amount is 70GB

CPU: Number of logical cores has to be not less than number of Netflow senders

Example: You have 16 routers sending Netflow data. Nectus creates one thread for each sender so ideal CPU configuration is with number of logical cores not less than 16.

Storage: We only recommend dedicated SSD based storage with minimum 200,000 IOPS rating.   We had very good experience with PCI-E Intel Optane SSD.

With recommended specs we should be able to support  close to 30Kfps Flow rates

Download best Netflow collector


Today we have achieved a new millstone with our Netflow collector performance:
50,000 flows per second processing speed was reached in Windows Server 2016 VM.
This rate was reached on VM with 64GB RAM and 1TB M2 SSD.
To simulate this flow rate we used 10 isolated instances of Netflow generator from Virtual Console (www.vconsole.com) with each instance generating 5Kf/sec.
There is no Netflow collector on the market that we are aware which can sustain this Netflow packet rate.
This explains why large cloud providers turn to Nectus for their Netflow processing needs when other tools fails to deliver.

Download 60 day trial:     Nectus Download

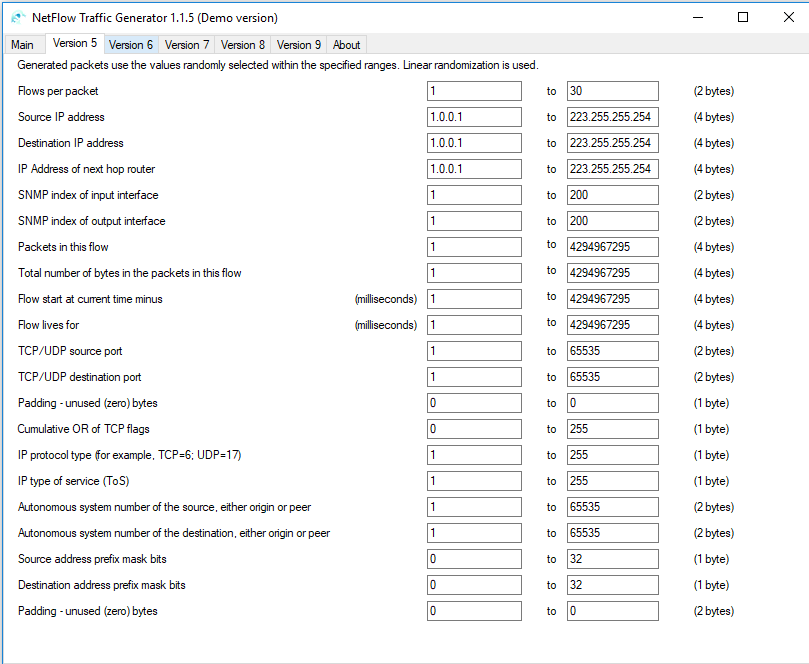
We offer NetFlow Traffic Generator utility that can send up to 30k flows per second with randomized parameters.

This tool is ideal for anyone who is developing Netflow Collector functionality.

Allows to generate large amount of NetFlow packets for protocol versions: 5, 6, 7, 8, 9 as if they were coming from real routers or switches.

Windows GUI provides control for every single parameter of the NetFlow packets.

Randomizaton of flow data. Support for multiple collectors. Simulation for up to 5000 routers.

Runs on any Windows OS.

Download Netflow Generator

Following Netflow reports are available for all Nectus Suite users starting from version 1.2.6

  1. Top Flows by Protocols
  2. Top Flows by Application
  3. Top Flows by BGP AS Source + Destination
  4. Top Flows by BGP AS Source
  5. Top Flows by BGP AS Destination
  6. Top Flows by IP Source + Destination
  7. Top Flows by IP Source
  8. Top Flows by IP Destination
  9. Top Flows by Source Countries
  10. Top Flow by Destination Countries

All reports are supplied with  IP Geolocation information. Netflow collector is a licence free component of Nectus suite.

Supported Netflow formats: V5, V9, IPFIX

Max number of flows per second: 30,000

Netflow collector runs on a dedicated VM or standalone server with following recommended specs:

OS: Windows 64 Bit

RAM: 32GB+

HDD: 1TB SSD

Starting from version 1.28 Nectus supports processing of inbound Netflow packets.

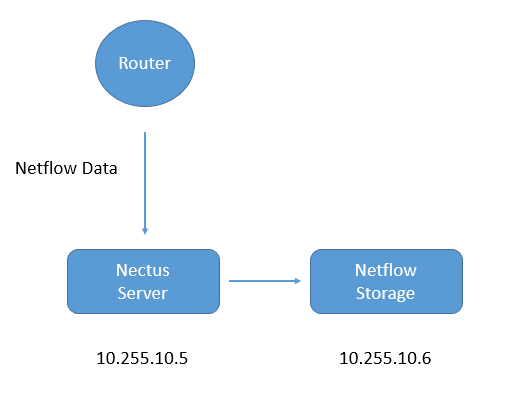
To enable Netflow functionality separate standalone Server or VM is required for Storage.

64 bit MySQL Server has to be installed on Netflow storage VM and DB Name, Root credentials and TCP port

for Netflow Storage DB  has to be configured on main Nectus Server under “Settings -> General Settings -> Netflow Integration”


Netflow Collector can support up to 30,000 flow per second.