Nectus Network Discovery

How to Manually Add Device Classification for Unknown Devices

Step 1:

Nectus maintains internal device classification database where each device is assigned a major platform category and a device model name.

Classification is associated with device SNMP Platform OID: (.1.3.6.1.2.1.1.2.0)

Classification database is updated daily and support for new devices included in every Nectus update. But in some rare cases Nectus might not have classification info for specific device and this device will appear under “Unknow Category” in SNMP device tree.

Nectus GUI allows customer to manually add Unknown device classification information directly into Nectus server database.

Right-click on SNMP Platform ID value and select “Add Product Definition for x.x.x.x.x.x.x” from the SNMP Devices context menu.

Graphical user interface, text, application Description automatically generated

Step 2: As the product definition modal opens, provide the sub-category (product) name, and select a category from the drop-down menu. If there is no applicable category name in the drop-down menu, you can define a new category name.

Graphical user interface, application Description automatically generated


How to discover/add a single device in Nectus

Step 1

In the main window, click on “Tools”, and in the drop-down box, select “Manual Network Discovery”

Step 2

The Discovery Start Window opens

Step 3

In the Discovery Start Window, change “Full Discovery” to “Partial Discovery”.

Step 4

Enter IP address and click “Start”

Step 5

The Start Discovery window asks, “Start Discovery, are you sure?” Click “OK”.

Step 6

Close the Discovery Start window by clicking on “Close” in the lower right-hand side.

Step 7

To check that discovery ran to completion, go to the Main Window and click on “Logs” and then select “Discovery Log”.

Step 8

The Discovery Log opens. Here we see that our discovery (ID 4) ran to completion in 0 minutes and 23 seconds.


How to Add/Discover Single SNMP Device in Nectus

Starting from Version 1.2.49 process of adding single device to Nectus database was greatly simplified and improved.

To discover single SNMP device open in Main menu Tools → Manual Discovery Start

In Manual Discovery window Select Partial Discovery and specify single IP address with /32 Mask for Subnet.

Press Start Button to start a Discovery process.

After Discovery starts you can monitor its progress in Discovery log located in

Top Menu Logs → Discovery Log

Each Discovery Job will have individual line in Discovery log

Manually Initiated Discoveries will have string “Manual” in Type Column as opposed to “Schedule” to scheduled automatic discoveries.

Each Discovery log record contain information about how many overall and new devices were discovered at each Discovery job.

If your manual Discovery job shows “0” New SNMP Devices discovered then you need to verify IP address, SNMP configuration and overall availability of device that you want to discover.


Manual Network Discovery Operation

Starting from Version 1.2.49 Nectus implements new and enhanced user interface for manually starting and stopping of Network Discovery.

To manually start network discovery, go to Tools → Manual Discovery Start

Where you will be presented with two options: Full Discovery and Partial Discovery

Full Discovery will perform ICMP/SNMP Scan on all subnets configured in global Network Discovery settings.

Partial Discovery gives an option to limit discovery to very specific subnets or single IP address.

In addition to Manual Start/Stop Option, Version 1.2.49 shows Discovery log with new column Type that differentiates Manual or Scheduled Discovery execution types.


Management Interface Selection for Network Devices

In this chapter, you’ll learn how Nectus selects Management Interfaces for Devices that are found during Discovery phase. Nectus will automatically select Management Interfaces using its own default logic. It also supports user-defined selection for cases where this is appropriate.

The specific topics we will cover in this chapter are:

  1. Default Logic for Management Interface Selection
  2. User-Defined Logic for Management Interface Selection
  3. Applying Selection Rules to Existing Devices

1. Default Logic for Management Interface Selection

During Discovery, Nectus finds all SNMP Devices on the network. Every Device has one or more Interfaces. Some of those Interfaces will have IP Addresses assigned to them, and could be used as the Management Interface for that Device.

Nectus has default logic for selecting the Management Interface for each Device. It checks every Interface on a Device looking for potential Management Interfaces. To be considered for selection as the Management Interface, an Interface must meet the following requirements:

  1. It must have a unique IP Address. Nectus will not select an Interface that does not have an IP Address, or that has an IP Address identical to some other Interface on the network.
  2. It must be Up. Netus will not select an Interface that is not Up.

From this list of possible Management Interfaces, Nectus selects one according to this priority list:

  1. An Interface name that begins with Mgmt
  2. An Interface name that begins with Loopback
  3. An Interface name that begins with Vlan
  4. Interface with lowest IP Address

If Nectus finds an Interface name that begins with Mgmt, it will use this as the Management Interface. If it does not find an Interface name that begins with Mgmt, it will look for one that begins with Loopback, and so on.

If Nectus does not find an Interface whose name starts with Mgmt, Loopback, or Vlan, it will select the lowest numbered IP Address on the Device.

This default logic allows Nectus to automatically select the correct Management Interface in most situations. To handle situations where the default logic is not appropriate, Nectus supports user-defined logic for Management Interface selection.

2. User-Defined Logic for Management Interface Selection

Defining your own Management Interface selection logic makes sense in two situations:

  • When the naming convention for your Interfaces doesn’t match the default rules
  • When specific Interfaces have special naming requirements

When a Device has applicable user-defined Management Interface selection logic, Nectus looks for that Interface before applying the default logic. As with the default logic, user-defined Management Interfaces:

  1. Must have a unique IP Address.
  2. Must be Up.

To create user-defined logic for a specific Device type right-click the Device name. In the menu that appears, select View Device Info.

This opens the “View Device Info” dialog box.

On the General Info tab, find the SNMP Platform ID and click the icon to the right of it to copy the ID.

Note: All Devices with the same model number have the same SNMP Platform ID.

Next Step is to go to Settings -> Products and Categories -> SNMP OID Libraries.

Select SNMP OID Libraries.

This opens the “SNMP OID Libraries” dialog box.

Select Management Interface Name in the Filter by OID Type list. Nectus displays all the current user-defined Management Interface Selection rules.

Click the Add button to open the “Add” dialog box.

Enter the SNMP Platform ID and the Management Interface Name Nectus should use for this type of Device.

3. Applying Selection Rules to Existing Devices

Defining new Management Interface selection rules will have automatic effect on all devices that will be discovered after rule is created but does not automatically apply those rules to existing Devices.

You need to tell Nectus to apply those changes to existing Devices.

To apply the user-defined selection rules to existing Devices, return to the “SNMP OID Libraries” dialog box and click the “Apply to Existing Devices” button.


This is basic configuration example of the SNMPv3 on IOS device.

This enables SNMP v3 with following parameters:

Authentication Protocol: MD5

Authentication Username: vconsole

Authentication  Password: nectus

Privacy (Encryption) Protocol: AES-256

Privacy (Encryption) Password: nectus

Configuration Example

====================

snmp-server group NECTUS_V3_GROUP v3 auth read TESTv3
snmp-server view TESTv3 mib-2 included
snmp-server user vconsole NECTUS_V3_GROUP v3 auth md5 nectus priv aes 256 nectus

Preventing Specific Subnets from Being Discovered by Nectus

In this chapter, you’ll learn how to prevent specific subnets from being discovered by Nectus.

The specific topics we will cover in this chapter are:

  1. Why Prevent Specific Subnets from Being Discovered?
  2. How Does Nectus Prevent Subnets from Being Discovered?
  3. Working with the Excluded Subnet List

1. Why Prevent Specific Subnets from Being Discovered?

Preventing specific IP subnets from being discovered can provide improved security. For example, if your client is a city government, they might want to hide the Subnet of the police force or other crucial services. A bank might want to hide the Subnet that their ATMs run on.

2. How Does Nectus Prevent Specific Subnets from Being Discovered?

Before Nectus scans the network, it consults the Excluded Subnets List. It doesn’t scan any Subnets it finds in this list and deletes any information about those Subnets from the Management Information Base (MIB).

3. Working with the Excluded Subnet List

To work with the Excluded Subnet List go to the Nectus Home Screen and select Settings -> Network Discovery Settings.

This opens the “WMI Monitoring Settings” dialog box. Select the Excluded Subnets tab.

Click Add to open the “Add Excluded Subnet” dialog box.

Enter the IPv4 Subnet and the number of Mask bits to identify the Subnet you want excluded.

Note: If you remove a Subnet from the Excluded Subnet List, it, and all the Devices on it, will appear the next time Nectus runs Discovery.


Preventing Specific Devices from Being Discovered by Nectus

In this chapter, you’ll learn how to prevent specific Device types from being discovered by Nectus.

The specific topics we will cover in this chapter are:

  1. Why Prevent Specific Devices from Being Discovered?
  2. How Does Nectus Prevent Specific Devices from Being Discovered?
  3. Adding Devices to the Ignore OID List
  4. Editing the Ignore OID List

1. Why Prevent Specific Devices from Being Discovered?

Preventing certain Device types from being discovered and displayed in the SNMP Devices list makes it easier to manage your network device inventory.

For example, you could have hundreds of printers connected to your network. But under normal circumstances, you probably don’t need to monitor them.

Preventing Nectus from discovering specific devices saves Nectus Server resources for the devices you really want to monitor.


2. How Does Nectus Prevent Specific Devices from Being Discovered?

During discovery Nectus collects information about every network device it finds. This information include SNMP Platform OID.

Nectus maintain “SNMP Platform OID Ignore-List” which contains a list of SNMP Platform IDs that should be ignored during discovery.

By adding specific SNMP Platform OID to “Ignore-List” you can prevent devices with that Platform ID from being added by Nectus to its database.

3. Adding Devices to the Ignore OID List

To add a Device type to the Ignore OID List, go to the “SNMP Devices” Panel on the Nectus Home screen and open the All Devices list. Navigate to the Product Specific Level containing the type of Device you want to hide and right-click on it. In the shortcut menu that appears, select Add to Ignore List and Delete.

Confirm the operation in the “Add to Ignore List and Delete” dialog box that appears.

Nectus adds the Device type to the Ignore OID List and removes this Sub-Category and all its Devices from the SNMP Devices list.

4. Editing the Ignore OID List

You can manually edit the Ignore OID List to hide Device types, make them discoverable again, or change the OID Prefix associated with them.

To edit the Ignore OID List go to the Nectus Home Screen and select Settings -> Network Discovery Settings.

This opens the “WMI Monitoring Settings” dialog box. Select the Ignore OID List tab.

Use the controls here to add Device types to the Ignore OID List or remove them from it. Any previously hidden Devices will appear the next time Discovery runs.

You can also manually change the OID Prefix by clicking the Edit icon to the right of the Sub-category to open the “Update OID” dialog box.


When it comes to Network Discovery we are absolute market leaders and can determine router model by the sound of its Fan. Just kidding..

But here is how we actually do it.

Let say IP address 10.20.45.1 is alive and we need to determine what type of device this is.

Step 1: Perform SNMP Get operation for sysObjectID.0 (1.3.6.1.2.1.1.2.0)

snmpwalk -v2c -c public 10.20.45.1 sysObjectID.0

This OID stores platform specific string which suppose to be unique for each device type.

For example device responds with: .1.3.6.1.4.1.9.1.924

This string is called Platform Specific OID and contain Vendor code in seventh position.

Each vendor has IANA assigned unique number listed here https://www.iana.org/assignments/enterprise-numbers/enterprise-numbers

In our case code is “9” which means that this is a Cisco device.

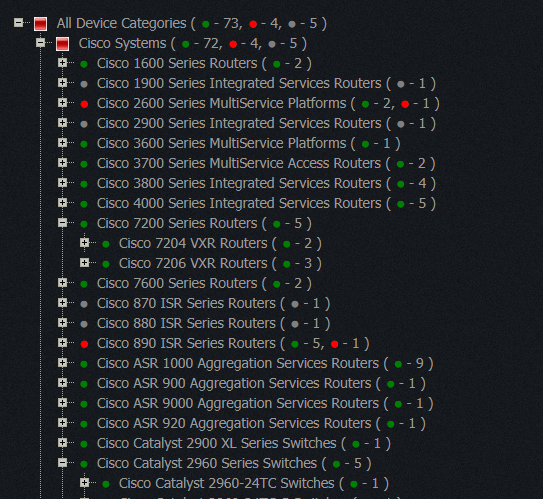
The remaining numbers define platform info and that information is collected from MIB files published by each vendor which we all collected and combined into a single repository of 1200 vendors which contains now around 56,000 different platform OID which we all classified by Device Category and Model.

At the end we have very nice device classification tree like this


On every Nectus installation that we conducted I noticed that on average each company has around 10% of network devices that are configured with well-known snmp v2 community strings: public/private.

This is as bad as using “cisco/cisco” as your SSH credentials. That is major security loophole as even read-only string “public” gives possible attacker complete view of the devices’ routing table, interface descriptions, interface IPs, device S/N, list of CDP neighbors with their IPs.

It is fairly easy to discover these devices by adding secondary SNMP profile to your favorite NMS and checking if there is a sudden spike in number of discovered devices.

Problem is so wide-spread that we added discovery of these devices to be a part of standard Nectus network discovery routine.

SNMP v3 does not have this issue as it has way more parameters that has to be configured, plus it gives  access to strong encryption, but for some reason adoption rates for SNMP v3 is low comparing to SNMP v2.

One of the biggest challenges with SNMP v3 deployments in diverse environments is a lack of consensus

among hardware manufactures on what set of Privacy Ciphers has to be supported/included in standard SNMP v3 stack.

Even Cisco was unable to unify list of supported v3 Ciphers in different product lines (ASA vs NX-OS vs IOS-XR).

Partially this was caused by the lack of RFC that defined AES-192 and AES-256 implementations  for SNMP v3 but this didn’t stop top-tier hardware

vendors from implementing  those Ciphers internally and partially it was  caused by slow v3 adoption rate that put very low pressure on hardware vendors.

In any case it is very unlikely that you will be able to pick single set of  SNMP v3 Authentication/Encryption parameters that will be supported on all of the devices

in a good sized enterprise network. This results in having to use and support different encryption ciphers in different devices and what most important this

will require your Network monitoring tool to support multiple SNMP profiles based on device type. Your monitoring tool has to discover what SNMP profile

is compatible with each device, “remember” it and only use compatible SNMP parameters when communicating with specific device.

Nectus is the only tool that was built from ground up with support for device specific SNMP profiles and it deploys patented discovery logic that allows it to match

compatible SNMP profile to each device in sub-seconds. Nectus supports up to 1000 SNMP profiles and used by multiple customers with 10K+ routers.

60 days Nectus Trial


Keeping your Visio network diagrams up-to-date is a full time job and not a fun one.
For any decent size network there are always changes happen every day and it is almost
impossible to keep track of those not to mention about adding those changes manually in Visio files.
The time of manual, static network diagramming is over.
Nectus (www.nectus5.com) is a a tool that makes all the manual work from network diagram creation process obsolete.
Nectus is the most advanced network discovery tool on the market that can generate network diagram
of any part of you network. You only need to pick a starting point, right-click and Select
“Expand Network Topology” and awesome looking network topology based on information from daily network discovery
will be ready in seconds. Network diagrams are based on database of “interconnections” discovered
via CDP and LLDP protocols which Nectus uses during its scheduled discovery jobs.
So as long as you run your discovery every night you can wake up every day knowing that that all of your
network diagrams are up to date.

Here is the list of the the possible reasons why some of the network devices can be missing after Network Discovery:

  1. SNMP is not configured or misconfigured  on missing device (Test SNMP operation via Tools -> SNMP Walk).
  2. SNMP ACL on missing device does not permit requests from Nectus IP Address  (Test SNMP operation via Tools -> SNMP Walk).
  3. IP address of the missing network device is outside of the range of configured subnets in Network Discovery and CDP is disabled on missing device.
  4. IP address of the missing network device is outside of the range of configured subnets in Network Discovery and device is located inside isolated CDP domain.
  5. There a Firewall between missing device and Nectus and it block ICMP and /or SNMP traffic.

During installation user must provide a standard corporate SNMP v2 or v3 Read-only credentials to be used for network discovery.

For each live IP address Nectus tries to use standard SNMP parameters as a first choice  but in addition to standard credentials Nectus attempts

to use some of the well-known SNMP strings such as v2 community “public”, “private”, “cisco”, etc.

This approach helps to find  rogue or misconfigiured devices that would normally be left undiscovered and pose a potential security issues.

To manage list of  “well-known” SNMP profiles go to “Settings -> Network Discovery Settings”.

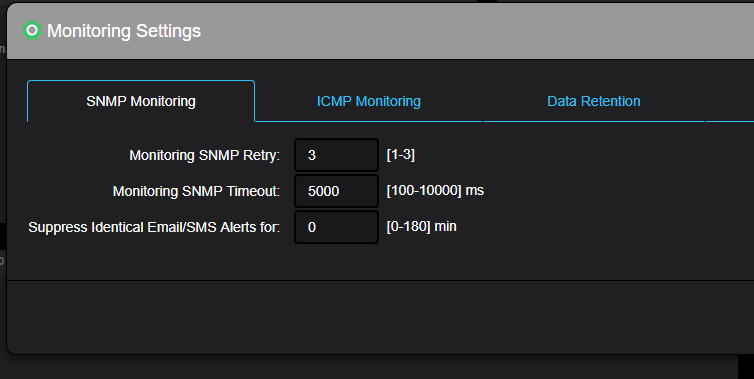
One of the first steps that we normally perform during POC is timer tuning for ICMP and SNMP for Discovery and Monitoring services.

Normally Discovery should have different timer values than Monitoring because Discovery operates in a “pessimistic” model when IP address

that is being probed by Discovery engine is likely not to be alive or  not to respond to SNMP therefore timeoute values and retry counts has to be very aggressive

for example 100 ms Timeoute with 2 Retries  for ICMP is normally sufficient. SNMP timer for Discovery have typical values of 1000ms and 1 retry.

Aggressive Discovery timers also reduces amount of traffic being generated and make discovery jobs run faster.


Monitoring Service timers are in opposite spectrum,  as Monitoring service operate in “optimistic” mode where it expects for all devices that are enabled for monitoring

to respond and timers has to be tuned to maximum wait time with ICMP timers as high as 300ms and SNMP timers as high as 5000 ms to support bigger/busier devices like Nexus 7018.


Nectus Network Discovery engine is one of the fastest among all that I worked with .. and I worked with most of them

(Cisco Works, Prime, Solarwinds, ManageEngine, Remedy, BMC)

I remember when it took Cisco Prime to scan 10.0.0.0/8 whooping 24 hours. Nectus finishes 10.0.0.0/8 in under 3 hours.

Speed of the discovery is very important quality as it minimizes impact on your network and allows you to schedule Discovery jobs in very

specific and narrow windows on weekends or during night times.


I am inviting users of other tools to post their Discovery times for 10.0.0.0/8 ..   there has to be some other good tools out there..

We all know how hard it is sometimes to find one single MAC address in the big network..

You have to look through the forwarding tables of many switches.

Nectus makes it easy. We scan forwarding tables from all the switches as part of regular Discovery jobs and save all MAC addresses and

corresponding Switch ports to a database. So you can find your MAC address in seconds.

Go to “Inventory-> MAC Addresses” for a complete MAC Address list

Very often our customers  has to live trough the M&A process where merging networks are configured with different SNMP parameters.

It can be just different  SNMP v2 community strings of different flavors of ciphers in SNMP v3.

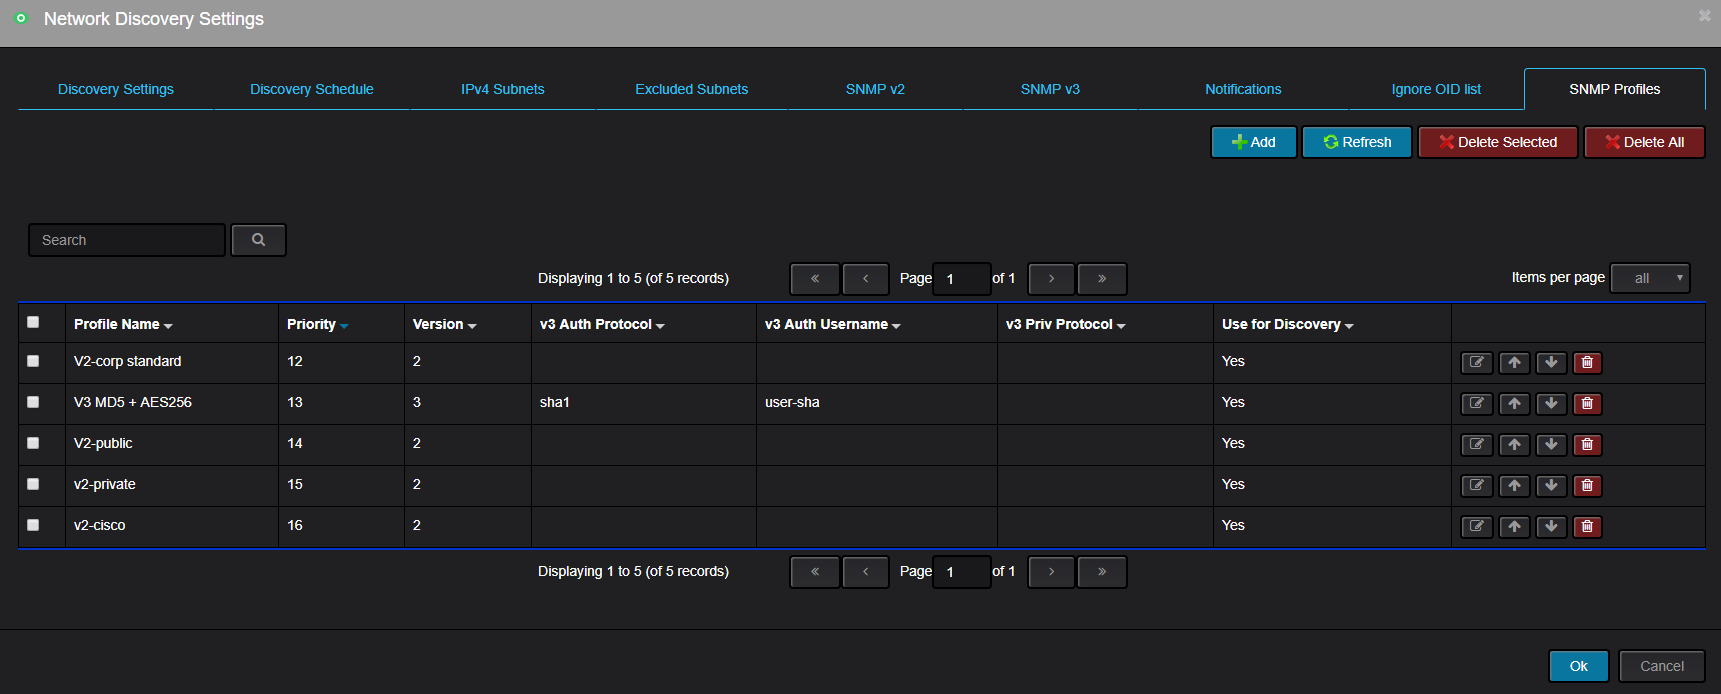
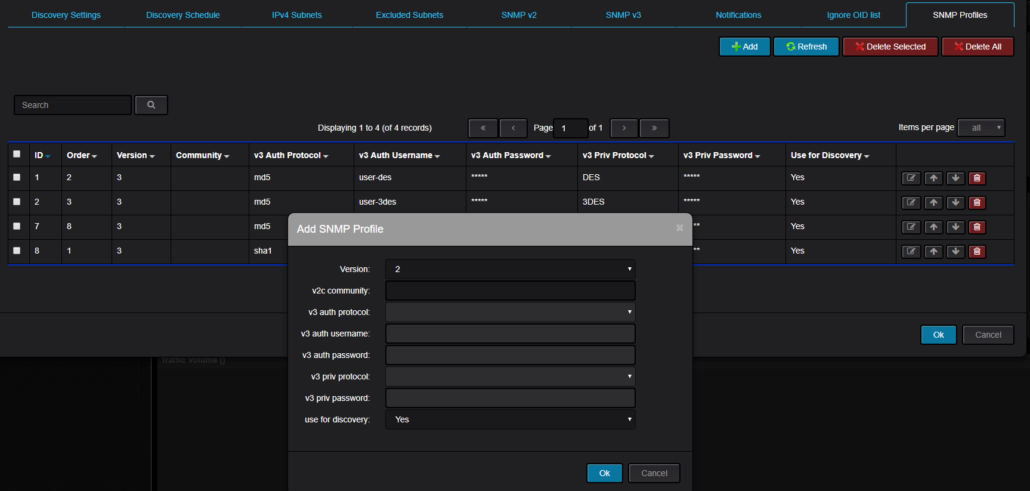
To support multiple SNMP settings within the single management domain Nectus implements a concept of SNMP profiles.

User can define up to 10 different SNMP profiles and Nectus Discovery will try them all in predefined order.

For each live IP address Nectus discovery will try each of the profiles until match is found.

Once correct profile is found it gets associated with specific device or IP address  and all further SNMP communications

for this specific device will be done with its “good”  SNMP profile.

To configure  SNMP profiles “Settings -> Network Discovery Settings -> SNMP Profiles”


When SNMP enabled  device is discovered for the first time it is placed in default group “Unassigned” in “All Sites” category.

User must manually move devices from “Unassigned” group to specific site where each device belongs to.

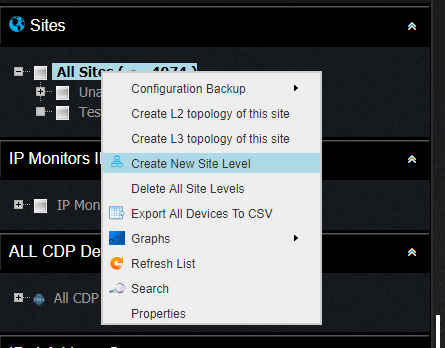
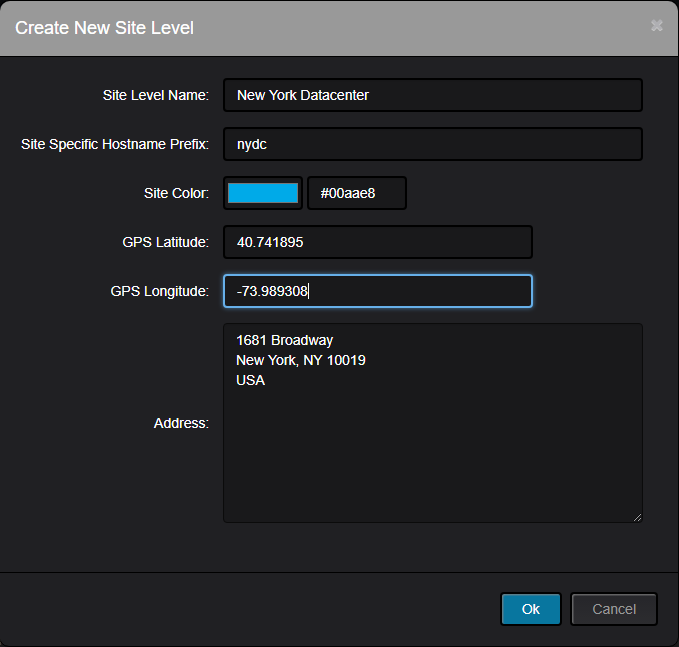
Initially each Site has to be manually defined. To create a Site right click on “All Sites” and select “Create New Site Level” in context menu


Define Site name, GPS coordinates  and Address


If  your devices share common hostname format with site specific prefix you can automate the placement of devices into each site

by defining a hostname prefix for this site.  This will ensure that all devices with the same prefix will be placed into  this Site.


For each router or switch found during discovery Nectus has to select one interface that will be used as a primary monitoring

interface for basic reachibility checks, destination for SNMP  queries etc..

Here is the selection order logic that implemented in Nectus Discovery Service:

  1. Select Interface that has assigned IP address associated with current DNS record for device Hostname
  2. Select Interface that starts with “Mgmt” (for example: Mgmt0)
  3. Select Interface that starts with “Loopback” (Lowest number if preferred)
  4. Select Interface that starts with “VLAN”  (Lowest number of preferred)
  5. Select Interface with lowest IP Address